Sunday, March 28, 2010

Who doesn't need a Giant Edible Penguin!?

Posted by Jennifer at 6:41 PM 4 comments


Hope wanted to surprise her husband-to-be with a personalized groom's cake. Apparently, it was a penguin that started their relationship (metaphorically, of course) and so she thought that giving him a penguin would be a great touch on their wedding day. Because Jonathan does a radio show, she asked to add headphones and a microphone. It's hard to tell from this picture but the penguin was HUGE. It was nearly two feet tall and the whole thing was edible. It had to weigh nearly 20-25 pounds... but what would I know? I'm a small-fry who makes someone else carry the heavy stuff. Anyway, it was made out of rice krispies and buttercream and then covered in marshmallow fondant. The eyes, beak, headphones, and microphone were made separately and then attached using skewers and buttercream to make sure it would all stay on for the hour drive north to the reception site. Wow, what a scary drive! Not for me, I sat in the back cuddled up next to my new penguin friend while my man-friend tried to ease the car over every bump and turn in the road (no, i didn't actually cuddle the penguin and yes, we made it just fine).


I wish I could give some advice or tutorial on how to make said penguin but my only advice would be .... buy LOTS of extra rice cereal and marshmallows because you will keep running out of those ingredients even though you think you have plenty. I made about 7 large batches or so.... and still needed more. I made the rice krispies and formed them into flat rectangles so that they could cool and harden. Then, I kept layering the "sheets" on top of each other with buttercream being sure to insert cardboard supports in two areas within the penguin (about 1/3 of the way up and again at 2/3 of the way up). Once it was the right height, I shaved it down to the right shape using a large serrated knife. I then covered the whole thing in buttercream and chilled it in the fridge. I shaved it down once again because when making a 3-D cake, it has to be pretty perfectly shaved, otherwise the bumps and nicks will show through in the fondant. Then I covered the whole penguin in marshmallow fondant. I added the white belly, headphones, eyes, and arms. Phew! It was so much fun and in the end, it was a pretty amazing feat! Perhaps more people will want giant edible penguins in the future... I know I do!
Friday, March 26, 2010

Music to my ears... and mouth....

Posted by Jennifer at 9:45 PM 3 comments
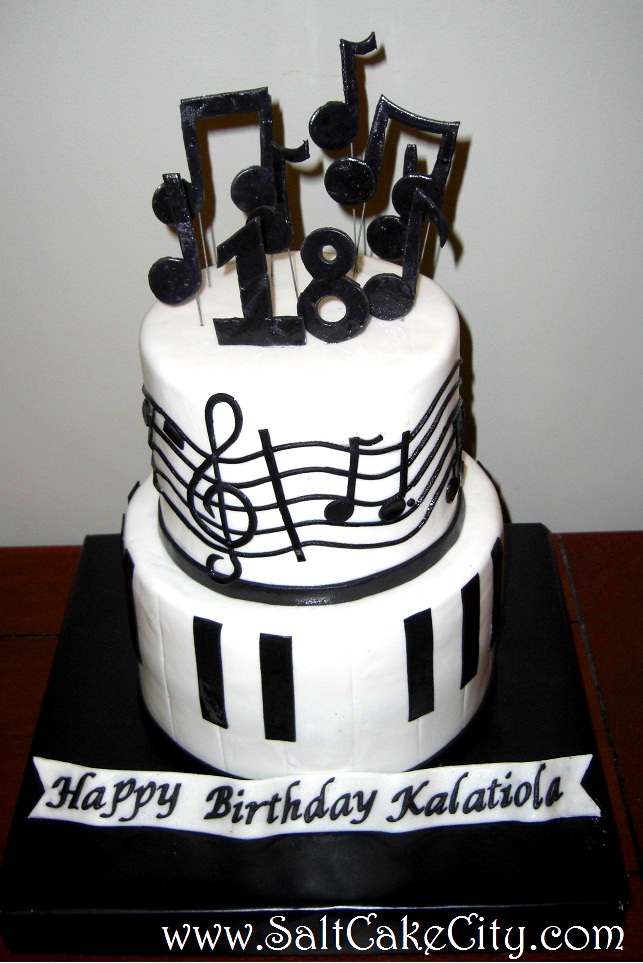
Latu needed a cake for Kalatiola's 18th birthday. Because she's really musical, we decided to do a piano on the bottom tier and musical notes all around the top tier. For an added effect, I made musical notes out of fondant and attached them to 18-gauge flower wire so that when they dried and hardened, we could just place them in the top of the cake. Both tiers were Strawberry Cheesecake Cake (strawberry cake with strawberries baked into the cake layered with cheesecake filling and cream cheese frosting). The banner at the bottom was also fondant. In order to make this, simply roll out a long thin strip of fondant (I use homemade marshmallow fondant). Take a few straws and space them out on the counter. Then lay the fondant strip over the straws to make it look like it's wavy. Let it dry overnight and then it's done! You should try it sometime!

A Princess Cake and Painted Flowers

Posted by Jennifer at 9:08 PM 2 comments
I've been doing some practice cakes for upcoming shows and thought I'd show you the work. The first is a Princess themed cake modeled after a beautiful cake done by The Pink Cake Box. I originally had a cake order for this one that fell through so I decided to make it anyway because it was just too cute. The whole cake is covered in marshmallow fondant. The butterflies and crown are also fondant. In order to make the crown, I rolled out the pink fondant and cut out the shape that I wanted. I added the diamond accents and used a fork to make the indents around the diamonds. Then, I took a fake styrofoam cake that was 4-inches around and wrapped the fondant around the fake cake. In order keep its shape, I then wrapped the whole thing with plastic wrap and let it dry for a few days. After it dried, I pulled the styrofoam cake out of the middle and the princess crown was hard and perfect!
The second cake I made was similar to the painted square cake I made a few weeks back. This was a really small cake, I think 4-5-6 inch square tiers. I hand painted the flowers onto the cake using food coloring and water. It was really easy to do! This would be really fun for a wedding with lots of color, maybe during the Spring. Pretty simple! :) More cakes to come soon, I promise.


Monday, March 22, 2010

Sports Cake

Posted by Jennifer at 1:38 PM 2 comments
Dominique needed a cake for a sports themed birthday party. The party was a joint birthday for two boys who play baseball, basketball and football together. I knew I wanted to keep this cake simple but unique and this was the design we came up with. The top two tiers are fake cakes and the bottom is a real cake (Cookies & Cake flavor). The cakes are all covered in homemade marshmallow fondant and decorated with the MMF as well. For the final details, I added a scoreboard that had their ages and names on there and also a Happy Birthday flag (pennant? yeah, I guess it was a pennant :) In any case, it was so much fun to make and for those of you that cake, you know it's actually harder to do a simple cake than a more detailed one because you have to get it all done correctly the first time. No room for error! I was inspired by a cake I saw on cakecentral.com. Thank you!

Sunday, March 14, 2010

Brown and Baby Blue Floral Wedding Cake

Posted by Jennifer at 2:25 PM 2 comments

Lindy got married yesterday and needed a pretty big cake to celebrate the occasion with her friends and family. Originally, she wanted a cake that was very simple with zombies crawling up the side, awesome right? Then she and her future-husband realized that might not go over so well with the older generation of family members and so thoughtfully opted against the semi-bloody cake. Instead, she wanted a cake with some floral design on it but not too much so that it was overwhelmingly busy. Here is the final result.

This cake was very challenging. Four tiers tall and a 30 minute delivery time makes for a lot of planning up front. The top tier was Cookies & Cake (vanilla cake layered with crushed oreos and buttercream), second tier was Tall Vanilla Latte Cake (vanilla cake layered with coffee cream filling and coffee buttercream), third tier was Ruby Red Velvet Cake (red velvet cake layered with cream cheese frosting), and the bottom tier was Spices & Cake (spice cake layered with cheesecake filling and cream cheese frosting). That is quite a variety! :)

The cake was covered in homemade marshmallow fondant. The floral pattern on the cake was done using brown buttercream and a few unique cake stencils. I hand-piped the blue accents on to the brown buttercream and around the design. Finally, I added a baby blue border to each tier to add just another little touch of color to match Lindy's wedding decor. In order to transport the cake safely, the bottom two tiers were together and the top two tiers were together for the drive. The wedding site was at a beautiful location up in a canyon here in Salt Lake. It rained and snowed pretty hard all the way up there but we made it and the cake made it in one piece (well, technically two pieces :) Here's an up-close picture of the top tier's design. I hope you likey!


Robot Cupcakes

Posted by Jennifer at 2:19 PM 2 comments

Gabe was turning two and his mom wanted some cool cupcakes for the party. I had saved a set of really unique cupcakes a while back that had the robot's head on a top cupcake, body in the middle and feet on the bottom. I always wanted to try them and so it was great when Shannon asked to replicate that idea with her son's robot design. These robots here match her design as closely as possible and ended up being pretty simple, once I got the little pieces all figured out :) There were 30 cupcakes in total and two flavors, Peanut Butter No-Cup Cake (chocolate cupcakes covered in peanut butter buttercream) and Chocolate Chip No-Cookie Cake (vanilla cake with chocolate chips baked in, covered in buttercream). The designs on the cupcakes are made out of marshmallow fondant. Fun!!!

Saturday, March 6, 2010

Mad Hatter Cake

Posted by Jennifer at 7:54 PM 4 comments

Dominique needed a special cake for her daughter's Alice in Wonderland themed birthday party. The group ate the cake to celebrate and then went to watch the new movie Tim Burton film. We both thought that a topsy turvy "Mad Hatter" style cake would be perfect. The top tier was a Banana Cream Pie Cake (a light banana flavored cake layered with banana cream filling and fresh, sliced bananas and buttercream). I had a little cake left over and made some for my man-friend and best friend and they loved the new flavor. The bottom was a Cookies & Cake Cake (sweet vanilla cake layered with chopped Oreos and buttercream). The cake is covered and decorated with homemade marshmallow fondant.


I had so much fun making this cake. It was really about the colors for me because I had to make sure they were vibrant and fitting for a birthday party. The swirls on the bottom were marshmallow fondant scrolls that I rolled out and placed on the cake. The hat was made out of rice krispies covered in marshmallow fondant. So much fun! I hope you like it!

Tuesday, March 2, 2010

Hand Painted Flower Cake

Posted by Jennifer at 11:33 PM 2 comments

I'm not much of a painter... especially on fondant so this was an experiment. This cake was modeled after one by Carrie's Cakes that I think is beautiful. I thought I would try it out. It took several hours to paint but was very calming and was what my man-friend would call a "flow" activity (a balance of enjoyment and challenge). It was a petite cake, I think it's a 4-5-6 inch square cake. For those of you who want to try this (and have the patience) all you need is food coloring and paint brushes to make it just simple water coloring. FUN!

Yo Gabba Gabba.... Who?

Posted by Jennifer at 6:36 PM 4 comments

Marianne wanted a cake for her son's birthday. Since Charlie loves Yo Gabba Gabba, she wanted the characters on a simple little cake for the party centerpiece. I had never heard of these folks before (Gabba Gabba folks, that is), so I had to do some research. Turns out, the big red, cyclops dude is in a car commercial so every time I see the commercial now I think of this cake.

This was a 6-inch round, White Almond Cake (almond flavored cake layered with cream cheese frosting and sliced almonds) covered in marshmallow fondant and handmade characters. These were so fun to make because they were really unique looking characters. In order to make the characters, I cut out basic shapes in the fondant and then simply layer on other the details. I say simply but it's very time consuming to get these just right. Luckily I like doing little meticulous jobs like this (haha). The robot, in particular, was really fun because of all of his buttons and bars (I don't know what to call those... antenna? Yeah, let's go with antenna).

Marianne wrote me afterwards and said she felt bad eating the cake because it was so cute.... haha... Well, it's all sugar so I'm glad they ate it and enjoyed it :)

Sunday, February 21, 2010

Green Dots & Bows

Posted by Jennifer at 12:06 PM 3 comments

This is a four tiered wedding cake accented with green and black. The green turned out to be darker than I had anticipated but the men in my home say this is one of their favorites. Everything on the cake is made out of homemade marshmallow fondant and the green accents are hand painted with green food coloring to get it a better shade of green (yet not exactly what I was looking for). This cake is modeled after a beautiful cake I saw on Cake Central and hope I did that person proud. It was actually very simple to make, it's a lot of dots and circles along with three small bows, but it took quite a bit of time to get the dots perfectly aligned. I was practicing with these colors because I have a few upcoming wedding cakes with green and black accents... exciting! Oh, and in case it's unclear, the bottom is the cake base that makes it look like the cake has a little character... I like that :)

Friday, February 19, 2010

It's HERE!! SaltCakeCity.com!

Posted by Jennifer at 11:29 PM 0 comments
I'm so excited to finally announce that I've created (painstakingly, hours upon hours, yelling, screaming, calling tech support, late nights, etc.) www.SaltCakeCity.com! Finally! Please check it out and let me know what you think... :)

Wednesday, February 17, 2010

Topsy Turvy Flowers and Duckys

Posted by Jennifer at 7:10 PM 2 comments

My apprentice, Alex, needed a cake for her sister's homecoming party and she's always wanted to make a topsy turvy cake. This was the perfect opportunity! She wanted to personalize this cake to her sister's likings and so the top tier has hand painted gerber daisies, the middle tier has doormats (because her sister collects photos of doormats and we specifically modeled these doormats after the ones her sister took pictures of), and the bottom tier has rubber duckys swimming in bubbles. The cake weighed 20 pounds and took hours upon hours to complete. The top tier was a Ruby Red Velvet cake, the middle tier was Chocolaty Chocolate Cake and the bottom tier was a Rainbow Bright Cake (with each layer of cake colored to match the design of the cake, so blue, pink, and yellow layers of cake with buttercream). Here's another view so you can see some more of the doormats.
Now for a little more detail. The gerber daisies were made by using a flower cookie cutter and simply layering two flowers on top of each other to give it some depth. The doormats were really fun because Alex spent a ton of time really getting the details right. They look identical to the ones in the pictures. Essentially, it was like using food coloring as water color painting. Took a while but was totally worth it. Lastly, the duckys were shaped by hand to look like rubber duckys. This is where it takes me back to being a kid and playing with play-doh. I use homemade marshmallow fondant for my cakes and it was really fun to mold that fondant into ducks. The beaks were then painted orange, we put little eyes on them and Alex painted cute eyelashes on them. In total, the cake was really a great reflection of Alex's sister and I hear the cake was a huge success at the party. Great job once again, Alex! :)

Sunday, February 14, 2010

Dave Matthew's Dancing Nancy Valentine

Posted by Jennifer at 2:48 PM 3 comments

Bill wanted a unique Valentine's Day cake and thought that Dancing Nancy would be a good way to personalize this holiday for his wife. When he started describing what he wanted, I finally had to ask, "Is this a Valentine's Day cake...?" :) He wanted the Dave Matthews Dancing Nancy on top and DMB on it (Dave Matthews Band). I added in a few roses and hearts and Bill was pretty happy with the end result.


This was my first attempt at a cake that's shaped this way (Ah! I don't know what it's called!). It's wider on the top and tapers in on the bottom. It's amazing what an electric turkey carver can do in the right hands. haha. All of the decorations are made out of marshmallow fondant, including the roses. I modeled the hearts after a cake I saw on Cake Central (I apologize for not getting your name). I cut red fondant into tiny strips and then rolled the ends inward. After letting them dry for a bit, they were nice and east to put on the cake. The letters and the Dancing Nancy are painted with silver shimmer dust to make it shine just a little more. It was red velvet cake to match the holiday layered with buttercream. Happy Chocolate Eating Day everyone!

Saturday, February 13, 2010

Silver Dots & Bows

Posted by Jennifer at 7:52 PM 2 comments


I love silver in general so I definitely love silver on cake. It's more time consuming than people probably think because fondant doesn't come in silver... instead we have to paint on edible silver "paint" essentially. It's a four tiered cake covered in marshmallow fondant. The dots are a mixture of black and white dragees (they're basically fancy versions of tiny and shiny jaw breakers) and dots of fondant that are painted silver. The trim and bows were also painted silver (hopefully that's noticeable :) This cake is modeled after a beautiful cake from Pink Cake Box. They do amazing work there and so I've always wanted to recreate some of their cakes. I hope I did them justice!

Thursday, February 11, 2010

New Amazing Flavors!

Posted by Jennifer at 11:52 AM 1 comments
Hey all, I'm just writing because I'm so excited about these new flavors on my flavor list. Thanks to the brainstorming of my man-friend and best friend, Salt Cake City has more cake to offer :) Please let me know what you think!

* Almond Joy Cake: A light coconut cake layered with coconut cream filling, chocolate buttercream, and almond slices.
* Banana Cream Pie Cake: Vanilla cake layered with banana cream filling, banana slices, and crushed vanilla wafers.
* Chocolate Hazelnut Cake: Chocolate hazelnut cake layered with hazelnut cream filling and buttercream.
* Cinnamon & Sugar Cake: Light cinnamon cake layered with cinnamon buttercream.
* Coconut Cream Cake: Light coconut cake layered with coconut cream, coconut flakes, and buttercream.
* English Toffee Cake: Sweet yellow cake layered with Heath toffee bits and rich chocolate ganache.
* If You Like Piña Colada Cake: Pineapple cake layered with coconut cream filling and buttercream.
* Lemonberry Cake: Lemon cake with raspberry filling and raspberry buttercream.
* Old Fashioned PB & J Cake: Peanut butter flavored cake layered with strawberry filling and buttercream.
* Strawberry Lemonade Cake: Strawberry cake with a tart lemon filling and buttercream.
* Tuxedo Cake: Alternating layers of chocolate and vanilla cake with buttercream.
* White Chip Cake: Sweet yellow cake with white chocolate chips and layered with buttercream.
* White Chocolate Dipped Strawberry Cake: Strawberry cake layered with white chocolate ganache

Wednesday, January 27, 2010

Twins who Love Purses

Posted by Jennifer at 10:02 PM 5 comments
Brian called to say that his wife and her twin sister were turning 30 this week and to celebrate, he wanted two really cool purse cakes. They were spending the week vacationing in Park City and so it was only fitting to do two really chic handbags. I modeled both of these cakes after actual purses but edited them just a bit while trying to keep the same feel and detail work. In addition to the cakes, Brian wanted to make sure that these were personalized for each woman. Dallas' cake was a vintage Chanel purse (Strawberry Tall Cake: Strawberry cake layered with vanilla filling and buttercream) while Danielle's purse cake was a Coach handbag (Supremely Lemon Cake: Lemon cake layered with lemon filling and buttercream). They both turned out to be life-size. The Coach bag was over 8inches tall, 9inches wide, and 4.5 inches thick. Everything in these pictures are completely edible and made out of homemade marshmallow fondant. The ladies are from Texas so we had to add that detail in here somewhere, so we thought of the key chain. There are doggy collars as well because they love their dogs, Dixie, Stella, and Miles. The Park City postcard was made out of marshmallow fondant and the trees are painted onto the "card." The necklaces were modeled after Carrie's necklace in Sex and the City.

Now for some more detail on caking. In order to give the cakes the right shimmer, I tinted the fondant just a touch and after covering the cakes, I painted the cakes with edible silver or gold shimmer. Although it's hard to see here, the shimmer made the cakes really glow. The lipsticks, necklaces, pearls, key chains, and dog collars were all hand painted as well. In order to make the pearl necklace, I rolled out small balls of white fondant. I let them dry and harden just a touch over night. They were hard on the outside but still a little squishy on the inside. Then, I took a thin wire (18 gauge florist wire) and threaded the beads onto the wire. After connecting the last ball to the first with the wire, I painted the whole necklace with white petal dust. It's pretty amazing to see how fast time can fly when you're caking! Hours and hours into the night... ahh, so fun!


Monday, January 25, 2010

A College Book in Cake

Posted by Jennifer at 10:41 PM 2 comments
My future-sister-in-law, Jenilynne, just got accepted to her first choice of colleges and we're so excited for her! For the occasion, I made a cake that looks like a huge book. Why Chemistry? I'm not really sure... in fact, everyone in my life teaches communication so I don't know why I wrote Chemistry and not communication... maybe because our books don't look so old. Haha. Anyway, it was a lemon cake with strawberry cream filling cake (it was an experiment and they are my guinea pigs). Most of the decorations are made out of marshmallow fondant but some of of them are made out of modeling chocolate (like the football and the apple stem). She doesn't drink coffee so I told her the mug was full of hot chocolate :) It was so much fun to try and make my first book! Yay! I told Jenilynne that I think I've made more cakes for her than anyone else in my life. So many life events for an 18-year old... ah, the good ol' days.

Elmo Box Cake

Posted by Jennifer at 10:19 PM 3 comments
Jeri wanted a birthday cake for Gabby and said she loves Elmo... just Elmo, none of those other Sesame Street characters :) She knew she wanted something unique and colorful so this is what we came up with. I've always wanted to do a box cake and this was the perfect opportunity for that. I was just so lucky that Jeri was awesome to work with (again)! This box was 8 inches by 8 inches by 8 inches which doesn't sound that big but this cake turned out to be pretty huge. There were two tiers here (4-inches thick each), and only the top was real. The cake was a Snow White Cake (sweet vanilla cake with vanilla cream filling and buttercream) dyed to match the colors of the decor (red, green, and blue, I believe). I know Jeri loved it and I hope Gabby did too.

All of the decorations are made out of homemade marshmallow fondant, including the bow on top. If you care to try caking on your own and want to learn how to make a bow, read ahead, otherwise you can stop here :)


In order to make the bow, roll out thin strips of fondant about 1.25-1.5 inches wide and 5-7 inches long. Take a small rolling pin (I use clean PVC pipe) and wrap each strip around the pipe and adhere the edges with a small dab of water. Now let the ends that you just adhered hang down from the pipe and prop the pipe up so that they can hang that way over night. When they are dry the next day, take a 6-inch baking pan and place each of the pieces in, some on top of each other, until they form a nice bow. Using a paintbrush, dab a bit of water wherever the bows touch each other. Happy Caking!

Sunday, January 17, 2010

M-I-C-K-E-Y M-O-U-S-E!

Posted by Jennifer at 3:53 PM 5 comments

Ivana wanted a Mickey Mouse Cake for her son's 2nd birthday... and by Mickey Mouse Cake, I mean, a Mickey Mouse head :) She was coming into town to celebrate the occasion with her family and needed a fairly large cake to do it in style. This cake was actually much bigger than I anticipated because the round face was a 9-inch cake and the ears were 4-5 inches round and the whole thing was 4-inches tall. It was all Chunky Monkey Cake, which is chocolate cake layered with chocolate ganache and banana cream filling and sliced bananas.
Although it looks very simple to do, this cake was pretty challenging to get right. Mickey is such a recognizable character that any slight error would be obvious so I had to make it as perfect as possible. The flash in the picture makes Mickey's face look more pale than it was but here's a front shot. Oh, I guess I should mention that "Sreten Rodendan Kristian" means Happy Birthday, Kristian in Croatian :)


Saturday, January 2, 2010

Gourmet Ding-Dong Experiment

Posted by Jennifer at 12:33 AM 4 comments


In an effort to make individual desserts for a recent holiday party, I inadvertently created a "Gourmet Ding-Dong," as one of my guinea pigs said (Thank you, Roger!). Having never tasted a ding-dong before, I wasn't sure if that was a good thing! One thing for sure, these mini-cakes were for total chocolate lovers. It was basically chocolate layered in chocolate, covered in chocolate and then wrapped in chocolate. YUM!

These are 2-inch round, 3-inch tall red velvet cakes layered with dark chocolate ganache. Half of them were filled with cinnamon cream filling and the others were filled with coffee buttercream. They were all covered in milk chocolate plastic (or modeling chocolate) and topped with a bit of buttercream and chocolate leaves or flowers (in order to separate the two flavors). Here are a few more views for you. I hope your mouth is watering... that
is, if you like chocolate!
 

Salt Cake City Copyright © 2010 Designed by Ipietoon Blogger Template Sponsored by Emocutez